How to deploy a MERN stack application on Heroku
MERN stack points too...

Hello, I am a WEB and MOBILE app developer. I like to write about Javascript, React, NextJS, React Native and all the good stuff.
A full-fledged application is the calming tune of every developer. As the functionality of the application and feature grow, the application demands a database and a backend to interact with it too. A newbie learning to develop applications suffers the over-diverse pool of syntax, one for the frontend, one for the backend, and another level of understanding to establish a concurrent run of both frontend and backend. But if you are a javascript enthusiast, that's not the case for you.
You can learn to code and develop a full-fledged application within the realm of your javascript syntax. The solution is the MERN stack which comprises MongoDB ( a NoSQL database), Express (a backend server framework), React (a frontend javascript framework), and Node ( a javascript runtime environment out of browser).
We are using MongoDB atlas -a cloud database
After building your MERN stack application, seeing it running locally on your machine at localhost://3000 certainly good, but to make it employer-ready, you should host it. I will show you how to deploy it on Heroku (container-based cloud Platform as a Service (PaaS) used to deploy, manage, and scale modern apps). Make your account.
- Folder Structure
You should follow the same folder structure to run scripts effectively.
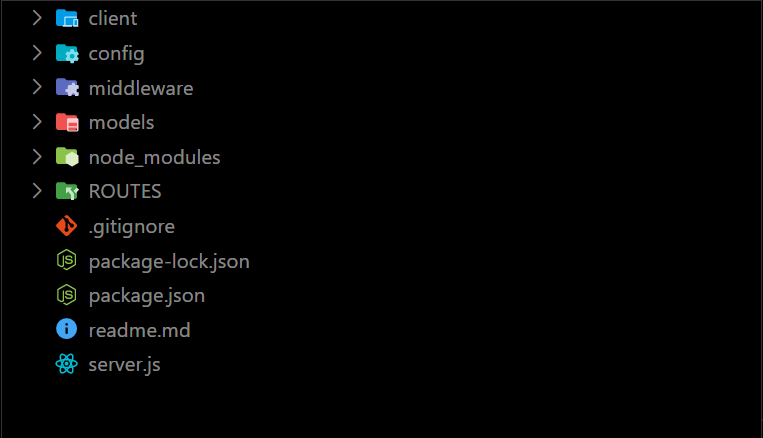
Your backend files and modules should be in the root folder directory (:/project_folder/) and your frontend in a folder in your root folder (:/project_folder/client_folder) Client folder is react frontend folder in the above image.
- Scripts for starting, building, and deploying your project
 "scripts": {
      "start": "node server.js",
      "server": "nodemon server.js",
      "client": "cd client && npm start ",
      "dev": "concurrently -n 'server,client' -c 'red,green' \"npm run server\" \"npm run client\"",
      "heroku-postbuild": "NPM_CONFIG_PRODUCTION=false npm install --prefix client && npm run build --prefix client"
  }
Edit the server.js to deploy only in production environment mode
if(process.env.NODE_ENV === 'production'){ //set static folder app.use(express.static('client/build')); app.get('*',(req,res) => res.sendFile(path.resolve(__dirname, 'client', 'build', 'index.html'))); }- Install the Heroku CLI
Check installation success with
heroku -vin the command line. It will show you the version.
- Install the Heroku CLI
Check installation success with
- Go to your project directory and
heroku login. This will invoke login in your browser. - Run
heroku create. It will create a domain name for your project to get hosted. Git repository You should make a local git repository for your project initialized in the root folder. Learn git here. Your changes should be up to date with the repository. To make sure,
git init
git add .
git commit -m "Preparing to Deploy
Now you need to add Heroku as a remote repository. Go to your Heroku dashboard and open your project with the same domain name. Go to the deploy section and you will see a command like
heroku git remote -a {heroku-project-name}- After adding Heroku as remote repository, you can push your project to Heroku by
git push heroku masterheroku open. To deploy the updated features, you must follow the same.