Planetscale DB and NextAuth.js starter for full stack applications
Functionality for User Creation and session for private routes

Hello, I am a WEB and MOBILE app developer. I like to write about Javascript, React, NextJS, React Native and all the good stuff.
😃Hello !
The world is already full of news and chaos and we rarely found joyful news, then it is better to reflect back on the joyful and funny memories and experience. What is better than sharing the funny incidents and laughter with the world and make this a better place to live in. Read and share your funny incidents, and experiences on funny-incidents⛷️⛷️⛷️
You can checkout this app and contribute fun and joy to the world or just enjoy some entries. HostedLink and RepoLink
With the growing popularity of PlanetScale database, and my love for NextJS and Next-Auth.js, I am more than motivated to build a full fledged appplication starter project with planetscale DB and nextauth as my tech stack.
🎯Focus
We are focusing to building a starter project with nextAuth integration to Planetscale database. We added the concept of funny incidents as an example of what can be made out of this starter. Now this starter takes care of Auth with smooth developer experience we had with Planetscale db. The standard aspects of any project is covered with this starter stack , i.e. NextJS, NextAuth and Planetscale DB
💎Usage
You can for the repo and make your full fledged applications
🎒 Pre-requisites
It is an advance tutorial and expect you to have basic knowledge about some concepts, launguage and tech stack, like;
- Javascript
- CSS
- NodeJS ( install)
- NextJS
- PlanetScale (install from here)
- SQL database
- Basics of authZ and authN
🛠️ Setup
To begin setting up the project, open a folder to directory you like in the editor and console. Write the following command to setup the project
npx create-next-app projectName
After moving to project directory cd projectName , install these packages via CLI
npm install next-auth @prisma/client @next-auth/prisma-adapter
npm install -g prisma
Setting up NextAuth 👤and PlanetScale with Prisma
PlanetScale🧰
As I am a windows user and wanted to experience Planetscale CLI, I had to install scoop to run planetscale cli. Follow here.
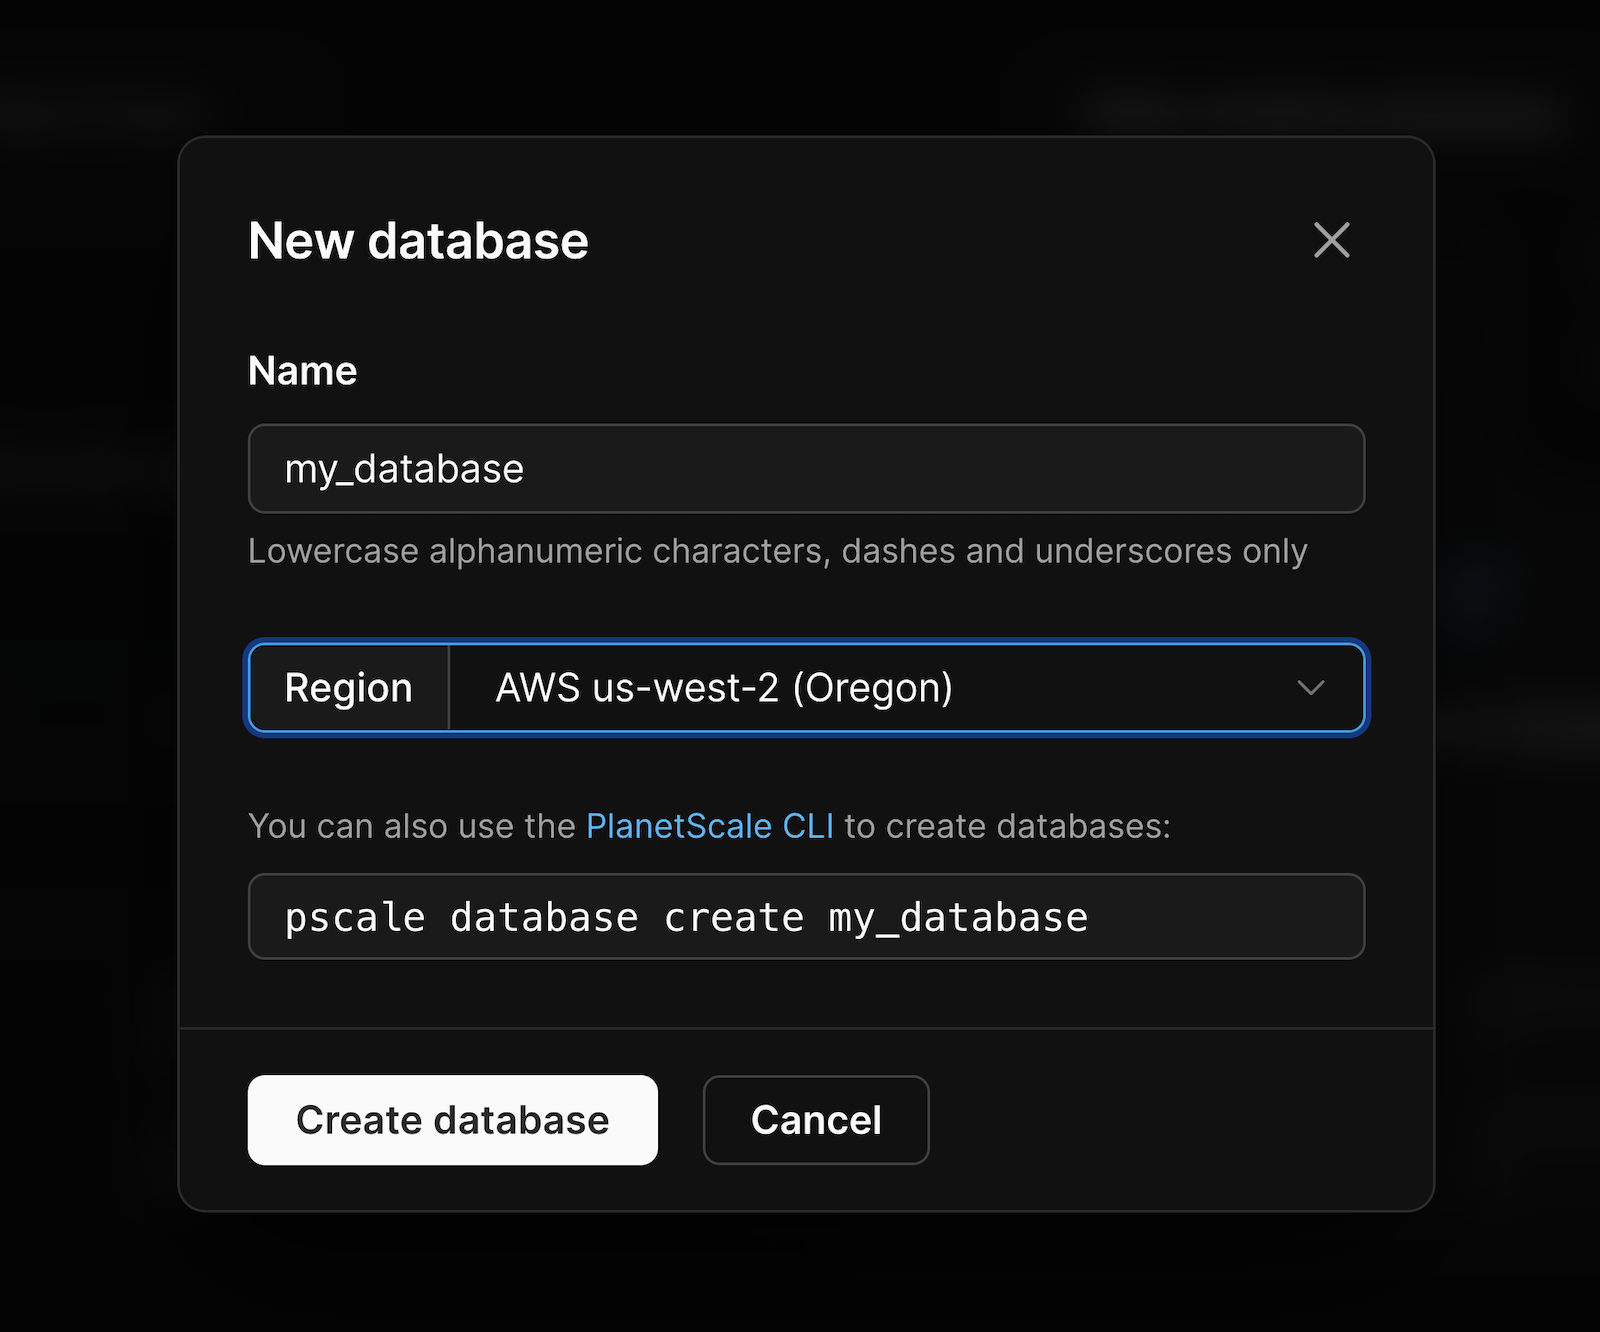
- Set up the PlanetScale Account🧰 and can create a new database from PlanetScale Dashboard
 Follow up on
 PlanetScale CLI usage here
Generate a connection string
In your PlanetScale dashboard, select your database, click "Connect", and select "Node.js" from the "Connect with" dropdown.Copy the DATABASE_URL string from the .env tab and paste it into your own .envfile. The structure will look like this:
DATABASE_URL='mysql://<USERNAME>:<PASSWORD>@<HOST>/<DATABASE_NAME>?ssl={"rejectUnauthorized":true}'
NextAuth is an open-source library that provides authentication authorisation support. It provides various providers like
apple,discord, etc for auth and many adapters are integrated likeFirebase,MongoDB,FaunaDB,DynamoDB,Prisma,etc.NextAuth provides hooks like
useSessionto be used at component and page level. It is very simple to integrate functionality like login and logout as NextAuth takes care all of the functionality related to jwt, refreshToken and accessToken.
NextAuth 🔐
To be able to use useSession first you'll need to expose the session context, <SessionProvider />, at the top level of your application:
pages/_app.js
----------
import '../styles/globals.css';

import { SessionProvider } from "next-auth/react"
export default function App({
  Component,
  pageProps: { session, ...pageProps },
}) {
  return (
    <SessionProvider session={session}>
      <Component {...pageProps} />
    </SessionProvider>
  )
}
Create a file called [...nextauth].js in pages/api/auth. And write the following code:
import NextAuth from "next-auth"
import GoogleProvider from 'next-auth/providers/google'
import { PrismaAdapter } from "@next-auth/prisma-adapter"
import prisma from '../../../lib/prisma'

export default NextAuth({
  adapter: PrismaAdapter(prisma),
  // Configure one or more authentication providers
  providers: [
    GoogleProvider({
      clientId: process.env.GOOGLE_CLIENT_ID,
      clientSecret: process.env.GOOGLE_cLIENT_SECRET,
    }),
    // ...add more providers here
  ],
})
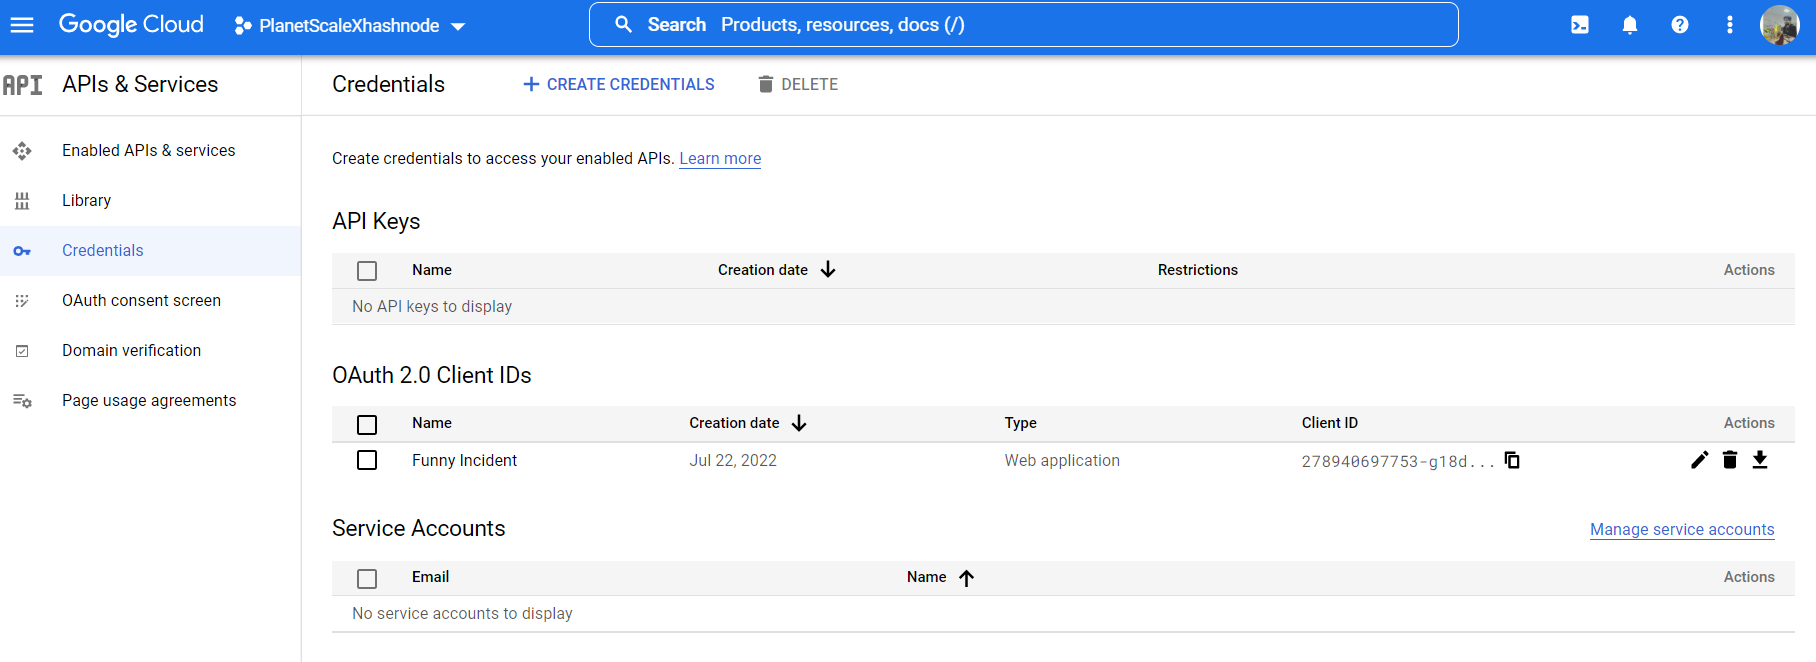
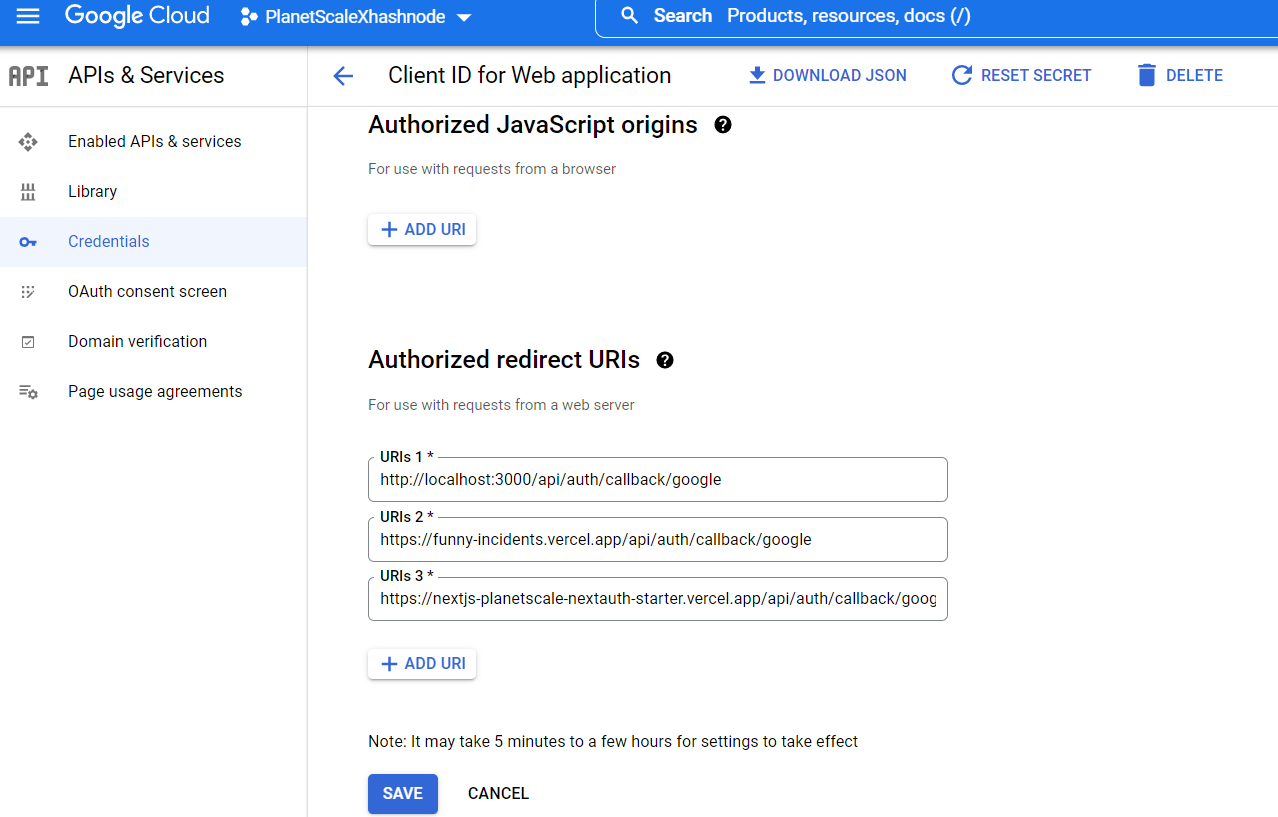
As you can clearly see, the provider used is Google, so you need CLIENT_ID and CLIENT_SECRET, which you can retreive from here. You can follow this guide to obtain credentials and paste them in /.env file under root project directory.
Connecting Prisma to PlanetScale and designing Schema for NextAuth
Create a file prisma.js under /lib folder in root directory and paste the following code:
import { PrismaClient } from '@prisma/client';

let prisma;

if (process.env.NODE_ENV === 'production') {
  prisma = new PrismaClient();
} else {
  if (!global.prisma) {
    global.prisma = new PrismaClient();
  }
  prisma = global.prisma;
}

export default prisma;
Referenced from official docs : Frameworks like Next.js support hot reloading of changed files, which enables you to see changes to your application without restarting. However, if the framework refreshes the module responsible for exporting PrismaClient, this can result in additional, unwanted instances of PrismaClient in a development environment.
As a workaround, you can store PrismaClient as a global variable in development environments only, as global variables are not reloaded:
Now, invoke prisma in your application;
npx prisma init
This command does two things: (referenced from here)
creates a new directory called prisma that contains a file called schema.prisma, which contains the Prisma schema with your database connection variable and schema models
creates the .env file in the root directory of the project, which is used for defining environment variables (such as your database connection)
Paste the following code in file schema.Prisma
generator client {
provider = "prisma-client-js"
previewFeatures = ["referentialIntegrity"]
}
datasource db {
provider = "mysql"
url = env("PLANETSCALE_PRISMA_DATABASE_URL")
referentialIntegrity = "prisma"
}
model Account {
id String @id @default(cuid())
userId String
type String
provider String
providerAccountId String
refresh_token String? @db.Text
access_token String? @db.Text
expires_at Int?
token_type String?
scope String?
id_token String? @db.Text
session_state String?
user User @relation(fields: [userId], references: [id], onDelete: Cascade)
@@unique([provider, providerAccountId])
}
model Session {
id String @id @default(cuid())
sessionToken String @unique
userId String
expires DateTime
user User @relation(fields: [userId], references: [id], onDelete: Cascade)
}
model User {
id String @id @default(cuid())
name String?
email String? @unique
emailVerified DateTime?
image String?
accounts Account[]
sessions Session[]
incidents Incident[]
}
model VerificationToken {
identifier String
token String @unique
expires DateTime
@@unique([identifier, token])
}
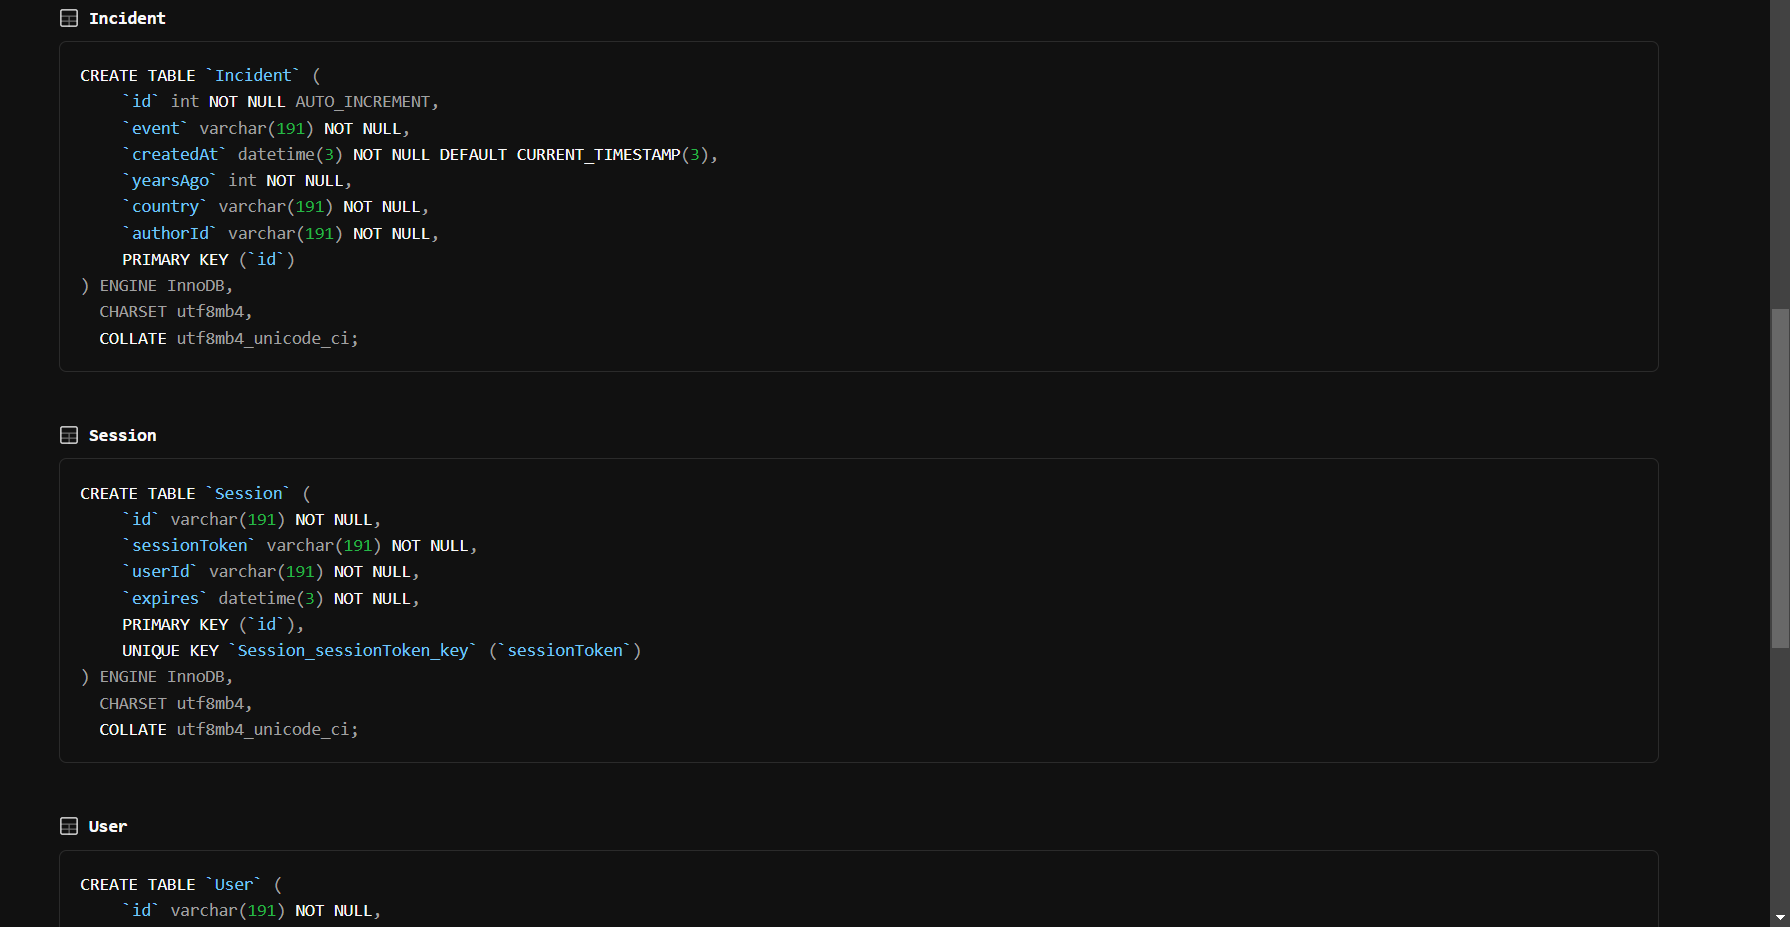
model Incident {
id Int @id @default(autoincrement())
event String @db.Text()
createdAt DateTime @default(now())
yearsAgo Int
country String
user User? @relation(fields: [authorId], references: [id])
authorId String?
@@index([authorId])
}
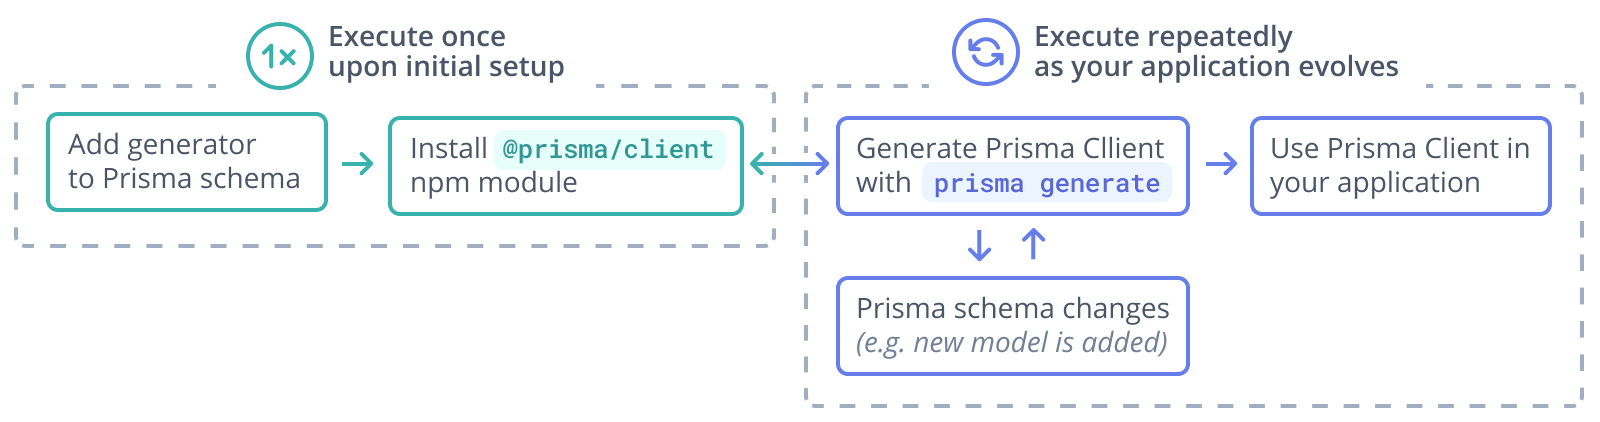
Run the following command to generate prisma client and re-run whenever your model changes in schema.prisma file
prisma generate
You can see the prisma client generation graphically from this image, taken from official docs
💡 Debug type errors for your failing model in
schema.prismafile. You can check and update your types mapped to Prisma with respect to MySql here
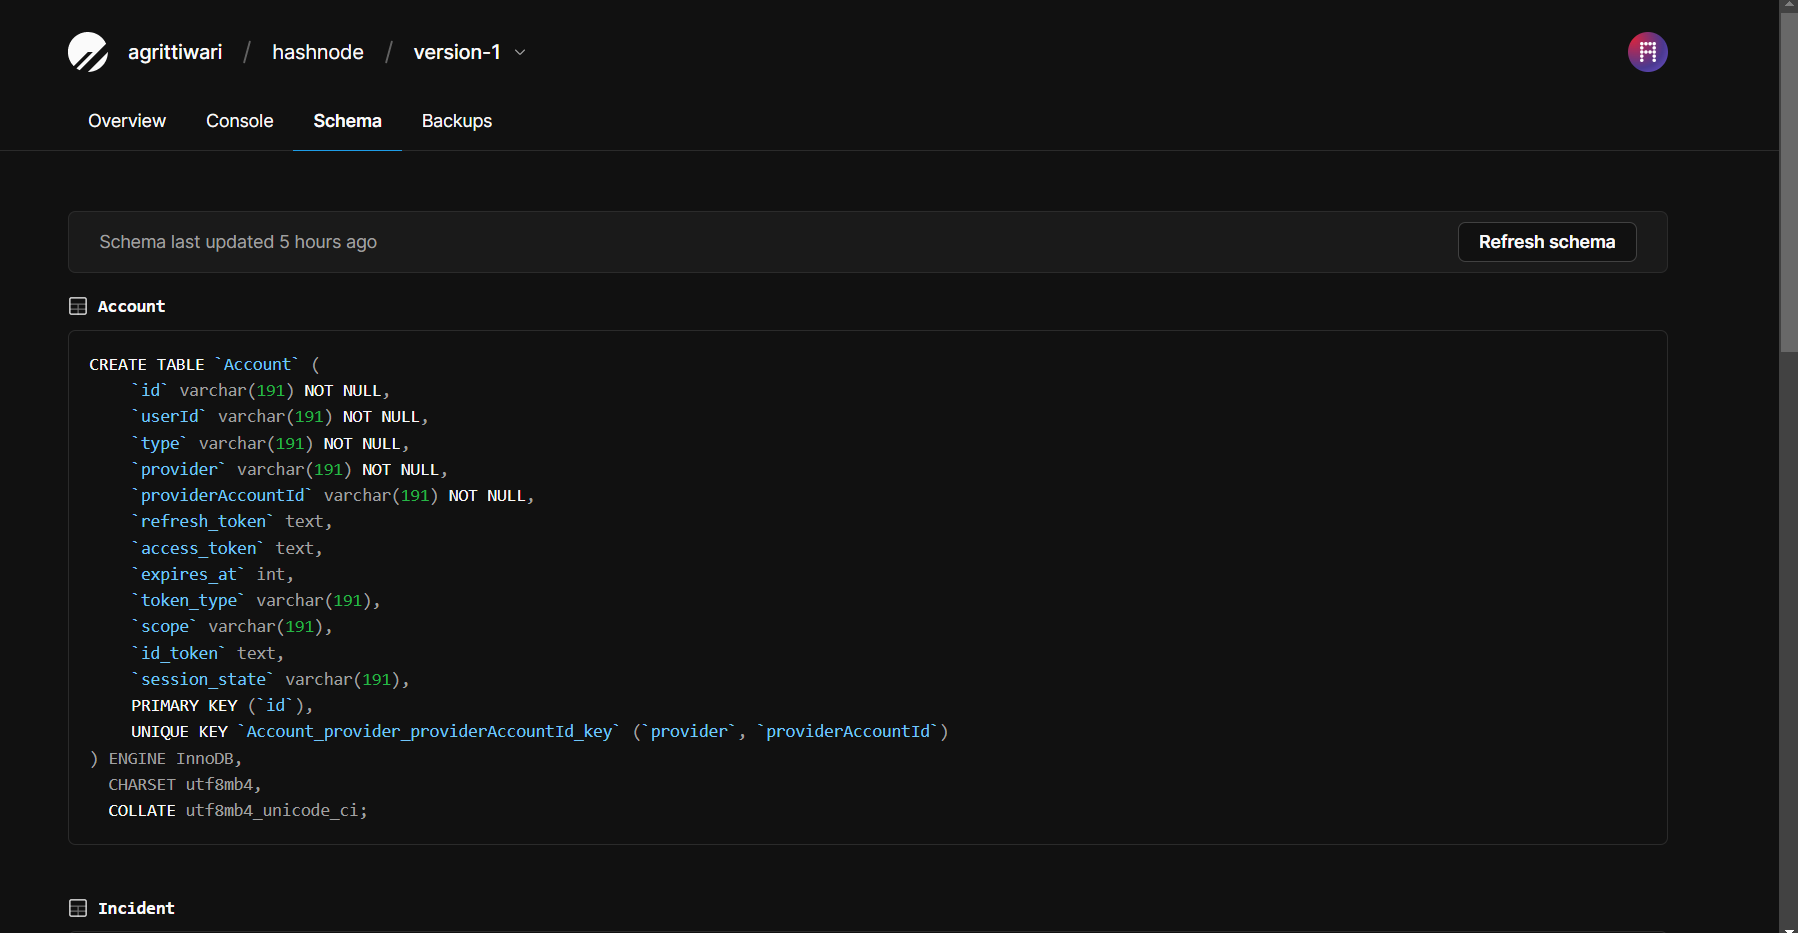
Populate the Planescale Database with updated Schema
With the database connected, you have to push the schema to your PlanetScale Database to perform read/write operation with Prisma client. Execute the following command:
npx prisma db push
prisma db pushuses the same engine as Prisma Migrate to synchronize your Prisma schema with your database schema. The db push command:Introspects the database to infer and executes the changes required to make your database schema reflect the state of your Prisma schema.
By default, after changes have been applied to the database schema, generators are triggered (for example, Prisma Client). You do not need to manually invoke prisma generate. from official docs
Dashboard will be like this:
Use Prisma Client to send queries to your PlanetScale database
Prisma client is used on the server side not browser side, so the following code takes care of GET and POST requests method on the file /api/addIncident/index.js
import prisma from "../../../lib/prisma";

export default async function handler(req, res) {
  if (req.method === "POST") {
    try {
      return await addIncident(req, res);
    } catch (err) {
      console.error(err);
      return res.status(500).json({ msg: "Something went wrong" });
    }
  } else if (req.method === "GET") {
    try {
      return await getIncident(req, res);
    } catch (err) {
      console.error(err);
      return res.status(500).json({ msg: "Something went wrong" });
    }
  } else {
    return res.status(405).json({ msg: "Method not allowed" });
  }
}

//-------GET THE INCIDENTS DATA FROM DB-------//
const getIncident = async (req, res) => {
  try {
    const incidents = await prisma.incident.findMany({
      include: {
        user: true,
      },
    });
    return res
      .status(200)
      .json({ incidents, success: "Successfully get the data" });
  } catch (err) {
    console.error(err);
    return res.status(500).json({ msg: "Something went wrong" });
  }
};

//--------ADD DATA TO TH DB OF INCIDENTS DETAILS--------//
const addIncident = async (req, res) => {
  try {
    const { event, yearsAgo, country, authorId } = req.body;
    const incident = await prisma.incident.create({
      data: {
        event,
        yearsAgo,
        country,
        authorId,
      },
    });
    return res
      .status(200)
      .json({ incident, msg: "Incident added succesfully" });
  } catch (err) {
    console.error(err);
    return res.status(500).json({ msg: "Something went wrong" });
  }
};
Why PlanetScale💻
I didn't knew MySQL database prior to this hackathon, but Planetscale has the best learning dashboard for a cloud db
- Smooth Developer experience
- Room for error and debugging with it branching capabilities
- Console at dashboard, I wrote many queries there and it's smooth
- Schema UI , simply awesome. I am very interested in learning and building apps with relational database, because of Planetscale DB.🥳🥳
Important Links
UI code
You can trace the UI code from the following link and visualise the UI as well:
🧑🚀Deployment to Vercel
To put the app in production, there are few thngs to take care of, these are:
Do add all the domains from your vercel dashboards on https://console.cloud.google.com/ to use nextAuth in production with Google as provider.
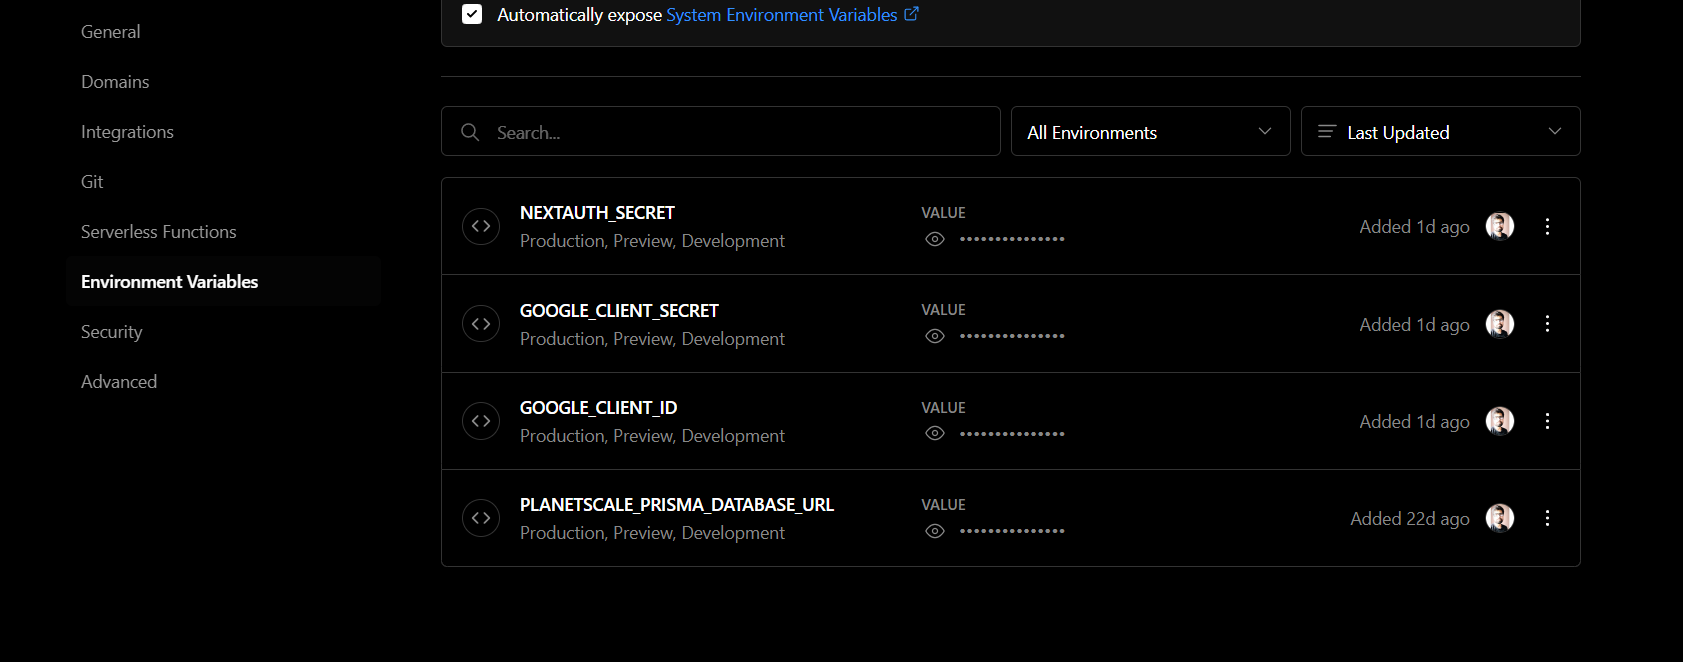
Add the environment variables
Add the following environvent variables, NEXTAUTH_SECRET,GOOGLE_CLIENT_SECRET,GOOGLE_CLIENT_ID, and PLANETSCALE_PRISMA_DATABASE_URL on the Vercel project Dashboard
🌼 Conclusion
This project can act as a starter for nextAuth and Planetscale integration. The project itself is a happy place. Thank you for your time.